Elevate Shipping
A short walkthrough of the day-to-day workflow for BC users. Covers everything in the current build: setup, movements, linkage, packing, departure / arrival posting, and cost allocation.
1. What Elevate Shipping does
Elevate Shipping adds container management to Business Central. You can:
- Track freight movements (vessel + voyage + carrier + ports + dates) and the booking lines on each movement.
- Assign a physical Shipping Container asset to each booking line with its seal, weights, packed date, ATD and ATA. The same container can appear on many movement lines over its lifetime.
- Link purchase, sales, and transfer order lines to a movement line so warehouse, purchasing, and finance can see what is allocated where.
- Post the departure and arrival of every line in one click from the movement card, with the underlying Sales / Purchase / Transfer documents posted as part of the same action.
- Allocate freight item charges across receipts or shipments by weight or volume.
- Record packing specifications on the movement line, and optionally per-document-line for customers who need that level of detail.
- Carry the packing detail across to the posted receipt or shipment line automatically when the order line is fully posted.
Two terms used everywhere in the rest of the document:
- Container = the internal asset id (e.g.
SC0001). What you store on the movement line and use to navigate. - Shipping Container No. = the physical ISO 6346 marking painted on the box (e.g.
MSCU1234567). What carriers and customs see.
2. First-time setup
2.1 Open Shipping Setup
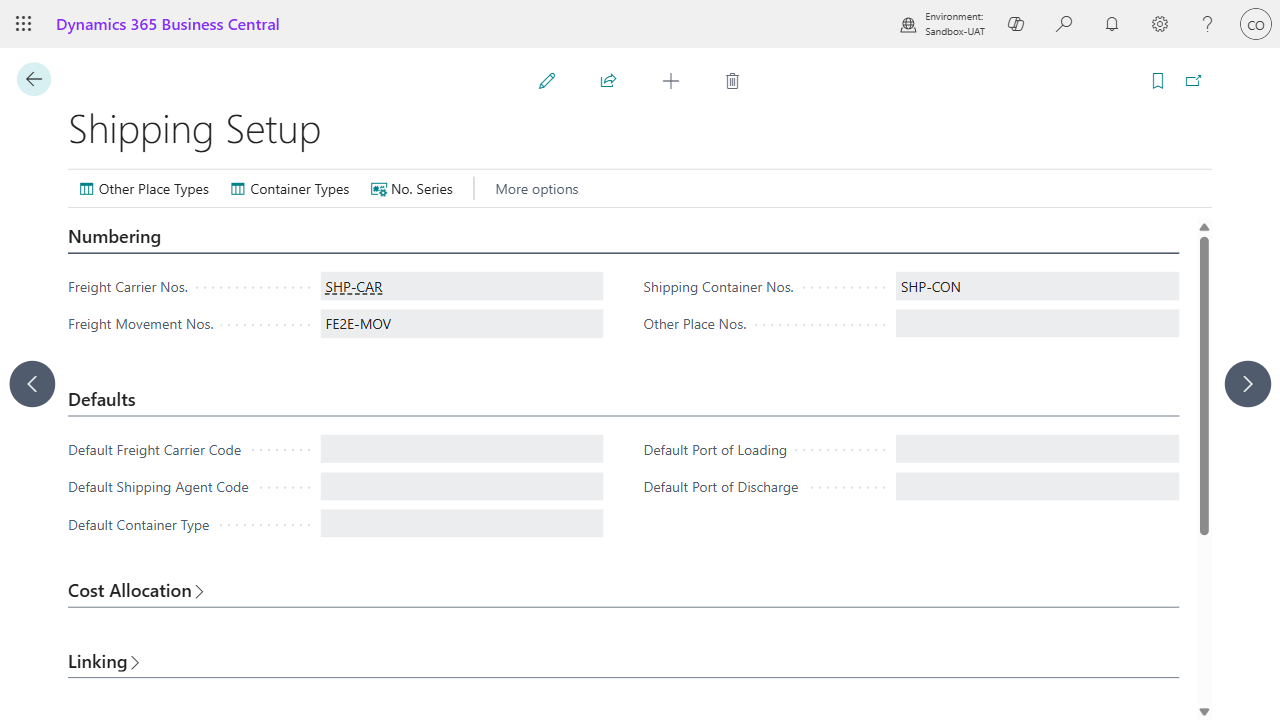
Search for Shipping Setup. The page opens already configured with sensible defaults. The fields you usually want to set on day one:
| Field | What it does |
|---|---|
| Default Freight Carrier Code | Proposed on every new Freight Movement. |
| Default Container Type | Proposed on every new Shipping Container. |
| Default Port of Loading / Discharge | Proposed on every new Freight Movement. |
| Notify on Linked Line Edit | Leave on. Raises a warning when someone changes a doc line already linked to a movement line. |
| Enable Per-Line Packing Specs | Off by default. Turn on if you need to record packing detail per source-document line and reconcile it against the movement-line spec. See §6. |
| Snapshot Container Weights at Booking | Off by default. Container Tare and Internal Volume cascade to active movement lines whenever you edit the container. Turn on to freeze those values per-voyage at the moment of booking (for customs / certified-weighing workflows). |
Number series for Freight Carriers, Freight Movements, and Shipping Containers (SHP-CAR, SHP-MOV, SHP-CON) come ready to use and are already bound on this page, so new records number themselves from day one. You can point any of these fields at your own number series if you have a house numbering convention. Movement Lines use a BC-standard Integer Line No. (10000 / 20000 / 30000 ...) scoped to the parent movement, like Sales Line and Purchase Line, so they do not need their own series. Other Places are manual-code by default; set Other Place Nos. if you want automatic numbering.
2.2 Reference data you start from
Elevate Shipping comes with the standard industry reference data already in place, so you can book your first movement straight away and grow the lists with your own codes as you go.
-
Container Types (search Container Types) cover the common ISO container classes:
20GP,40GP,40HC,20RF,40RF, each with its ISO code and default tare / max gross / internal volume. Add a row for any container class you handle that is not listed, and adjust the default weights and volume to match your carrier's specs.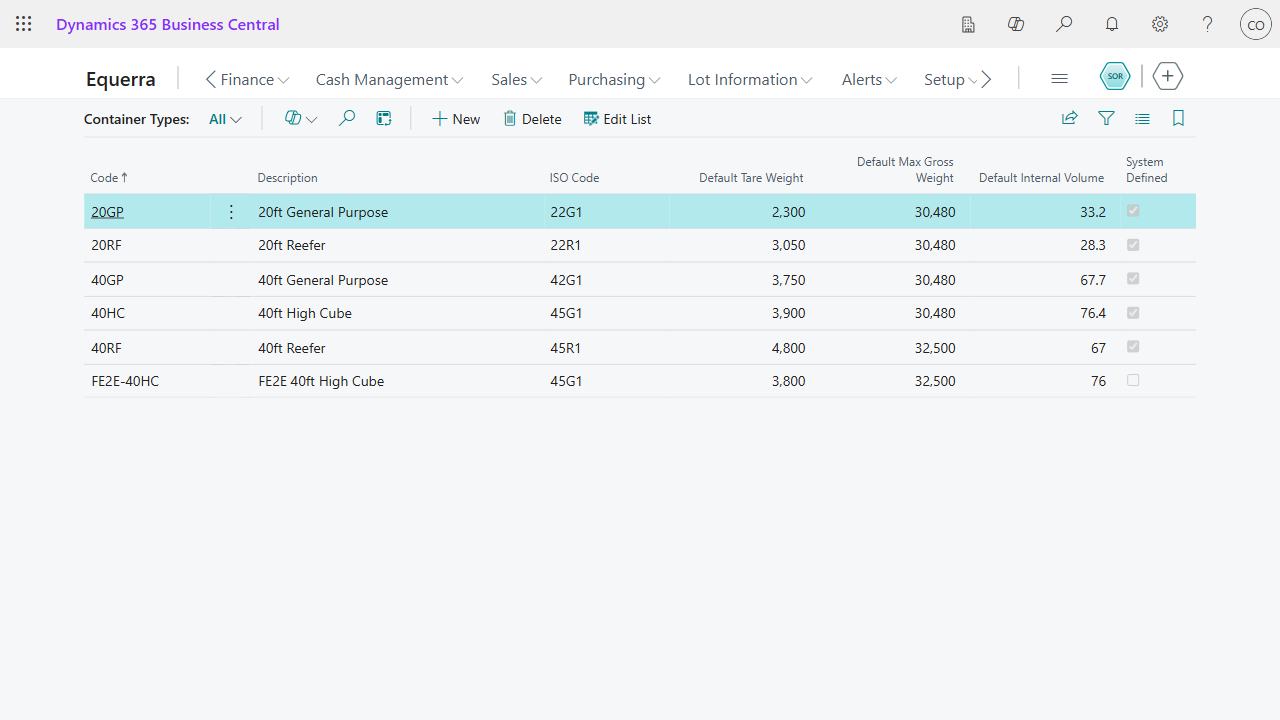
-
Other Place Types (search Other Place Types) classify the places you ship through:
PORT(Kind = Port),YARD(Kind = Yard),TERMINAL(Kind = Terminal). The Kind is what drives the port-only filtering elsewhere in the app. Add your own types if you need a finer classification.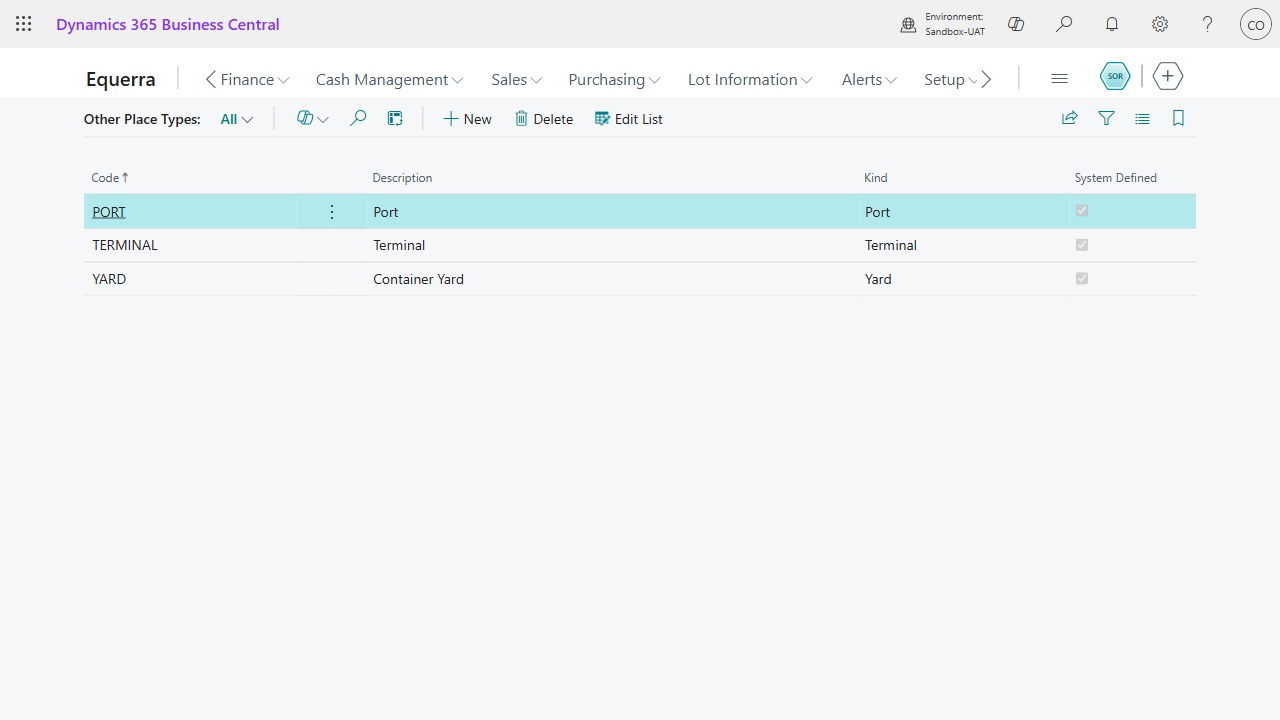
The standard rows above are marked System Defined: you can edit them, but they cannot be deleted while they are in use. Any Container Types or Other Place Types you add yourself are fully under your control.
2.3 Set up Other Places
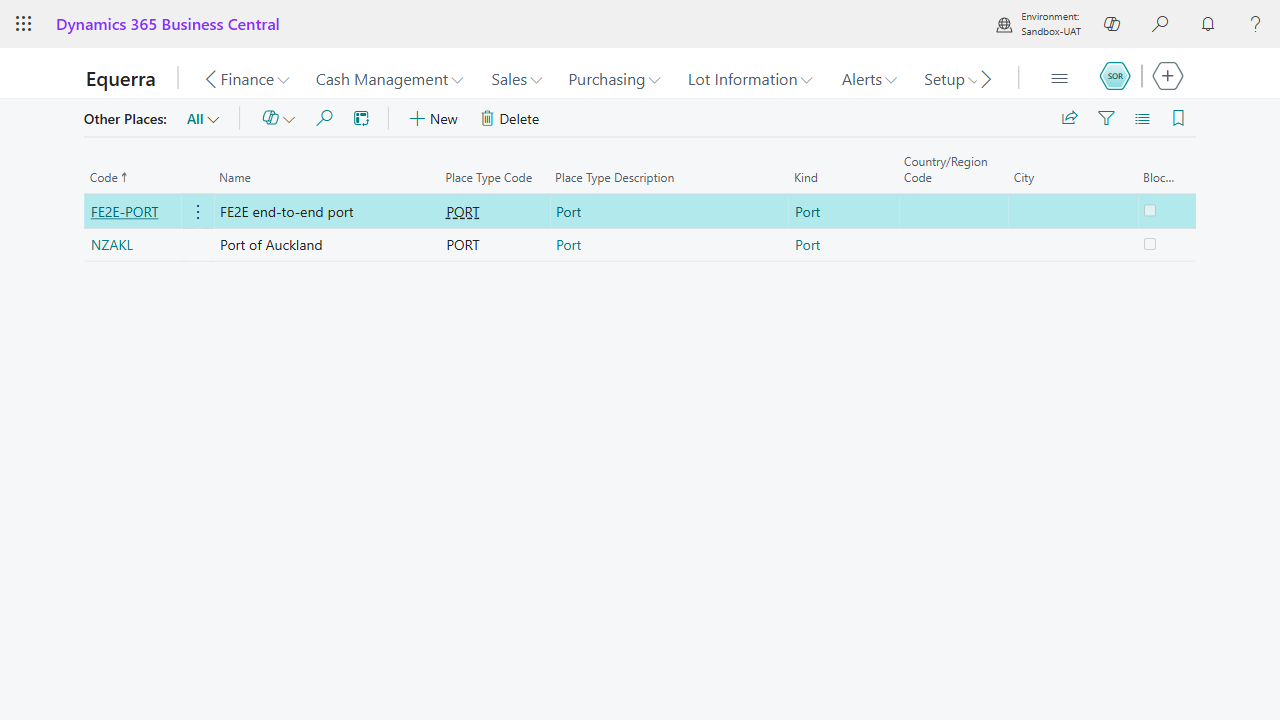
Search for Other Places. Create one record per real-world port, yard, or terminal you ship through.
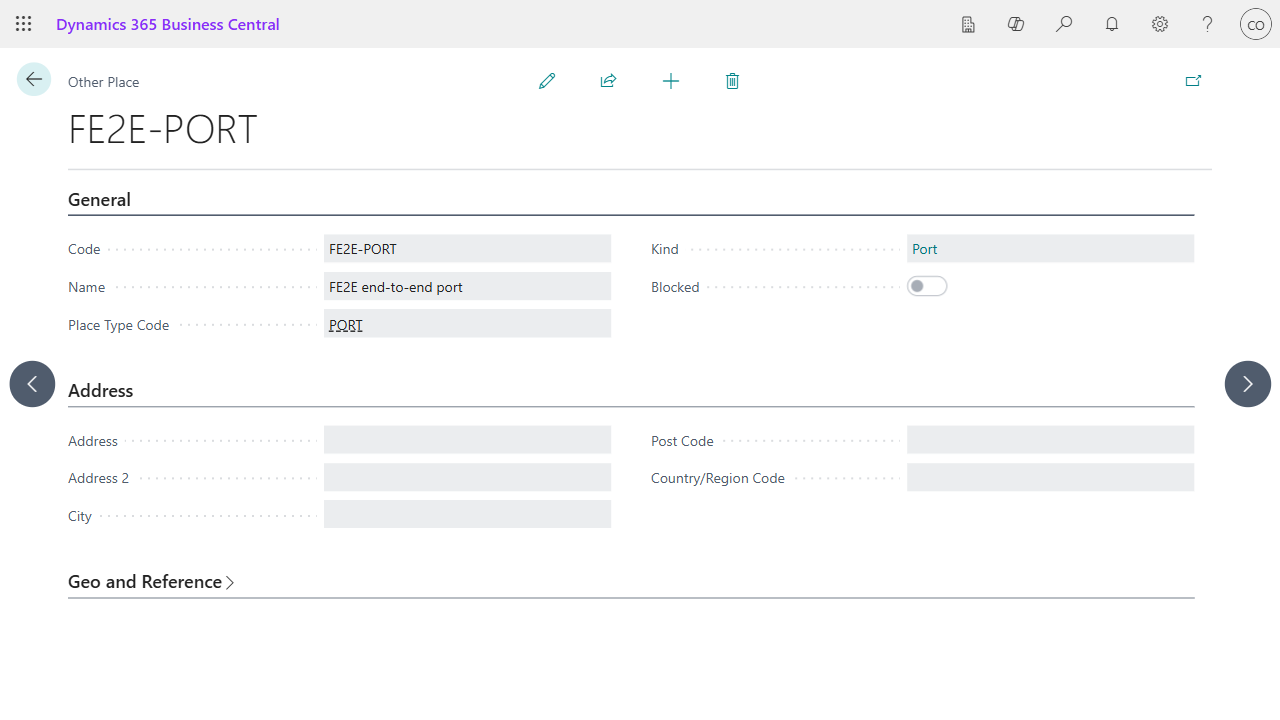
For each place:
- Click + New.
- Enter a Code (or let the number series assign one).
- Enter the Name.
- Pick a Place Type Code. The Kind on that type (shown on the Other Place card as a read-only Kind field) is what filters port-only dropdowns elsewhere.
- Optionally enter Country, City, Post Code, Address, UN/LOCODE, Lat / Long.
The Other Places list has a built-in Ports view that filters down to places with Kind = Port.
2.4 Set up Freight Carriers
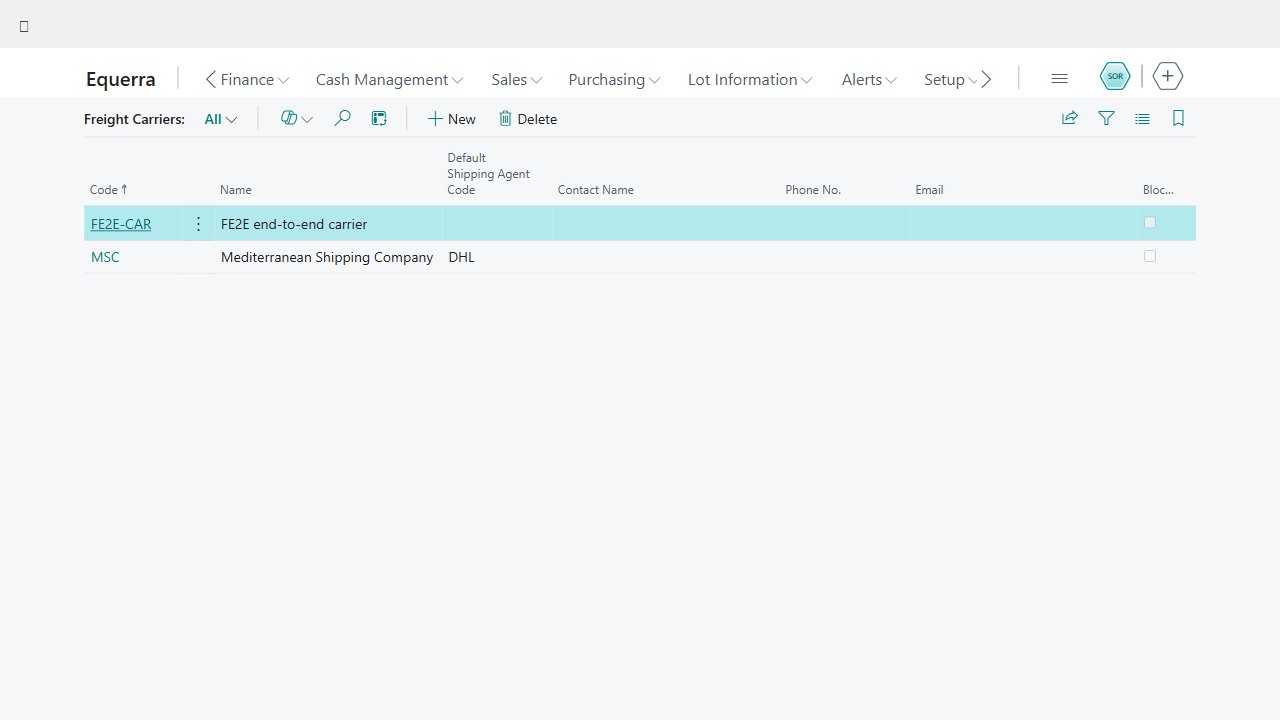
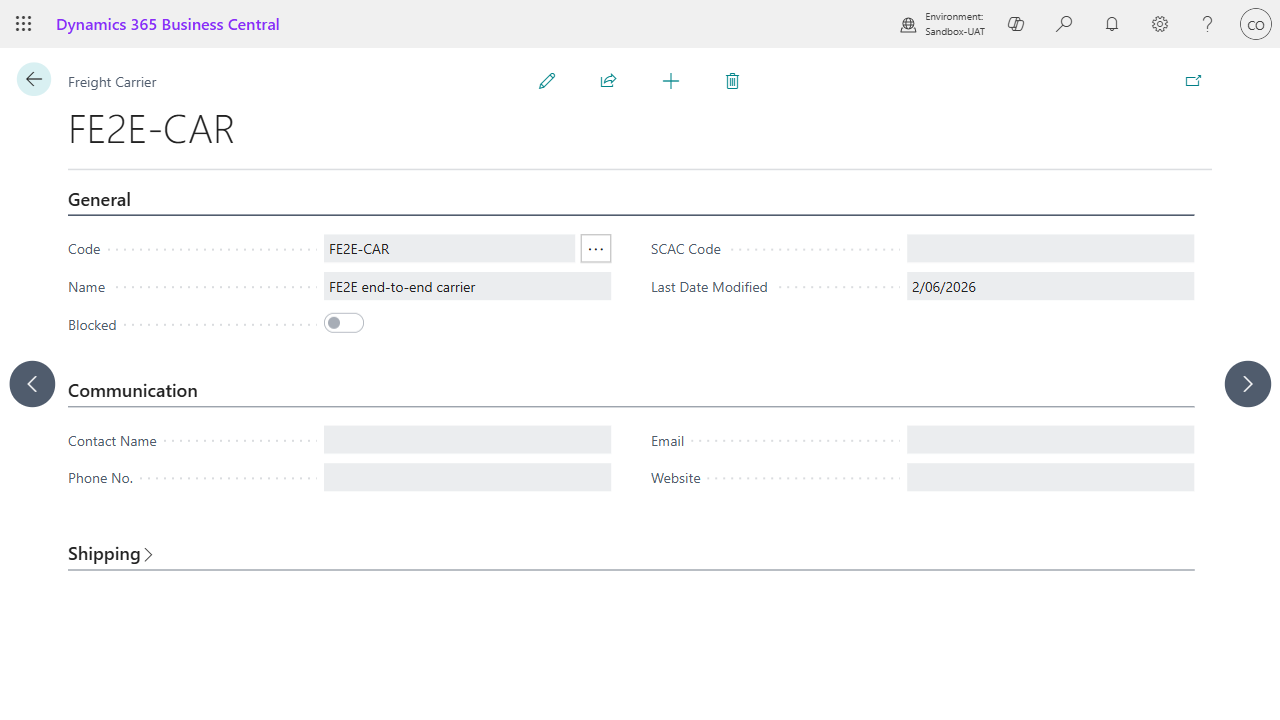
Search for Freight Carriers. Create one card per shipping line or forwarder you use. The card lets you pin a default Shipping Agent so it propagates into Freight Movements when this carrier is selected.
2.5 Set up master-data defaults
You can pin a default carrier and default ports on a per-master-record basis. The fields live on:
- Vendor card: Default Freight Carrier, Default Port of Loading.
- Customer card: Default Freight Carrier, Default Port of Discharge.
- Location card: Default Freight Carrier, Default Port of Loading, Default Port of Discharge, plus an Is Port boolean if the location itself acts as a port.
The port fields filter on Other Places where Kind = Port, so only port-flagged places show up in the dropdowns.
3. Creating a freight movement
A Freight Movement represents one journey (one vessel + voyage, one set of dates, one carrier, one origin and destination pair). Each movement carries one or more Movement Lines (the bookings you agreed with the carrier), and each line carries one physical Shipping Container.
3.1 Open the Freight Movements list and click New
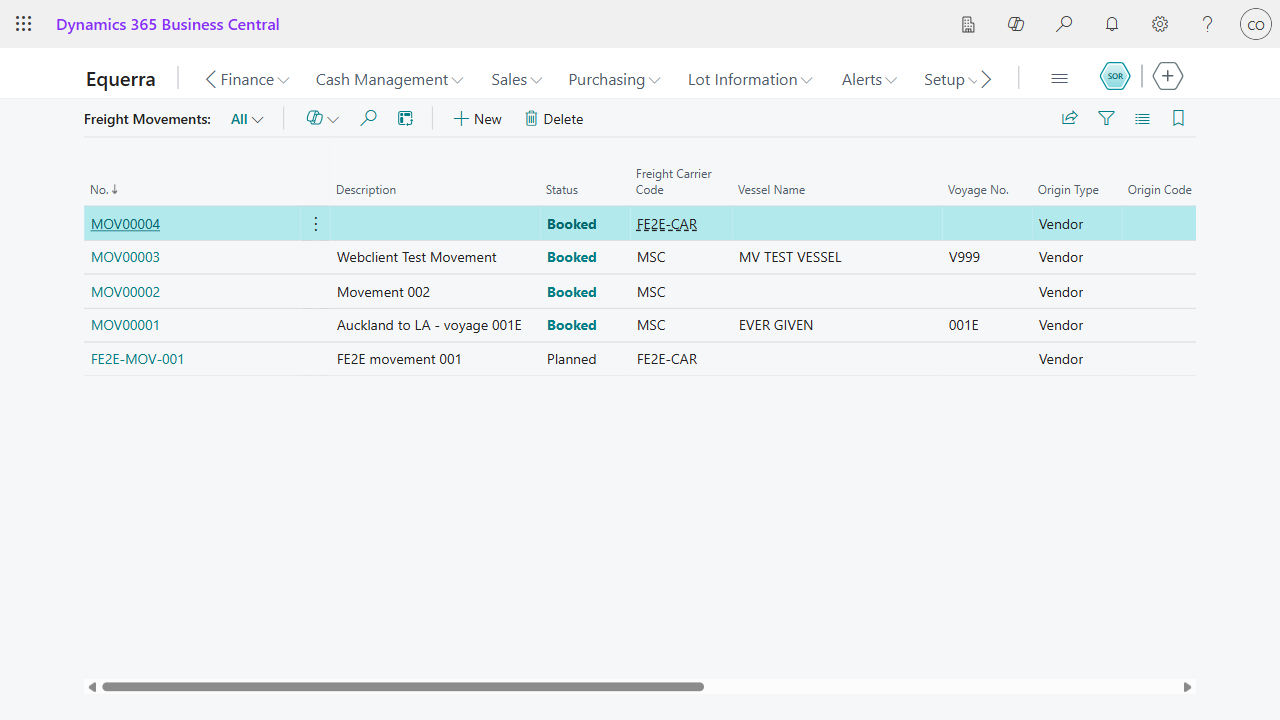
Search Freight Movements, then click + New to open a fresh card.
3.2 Fill in the header
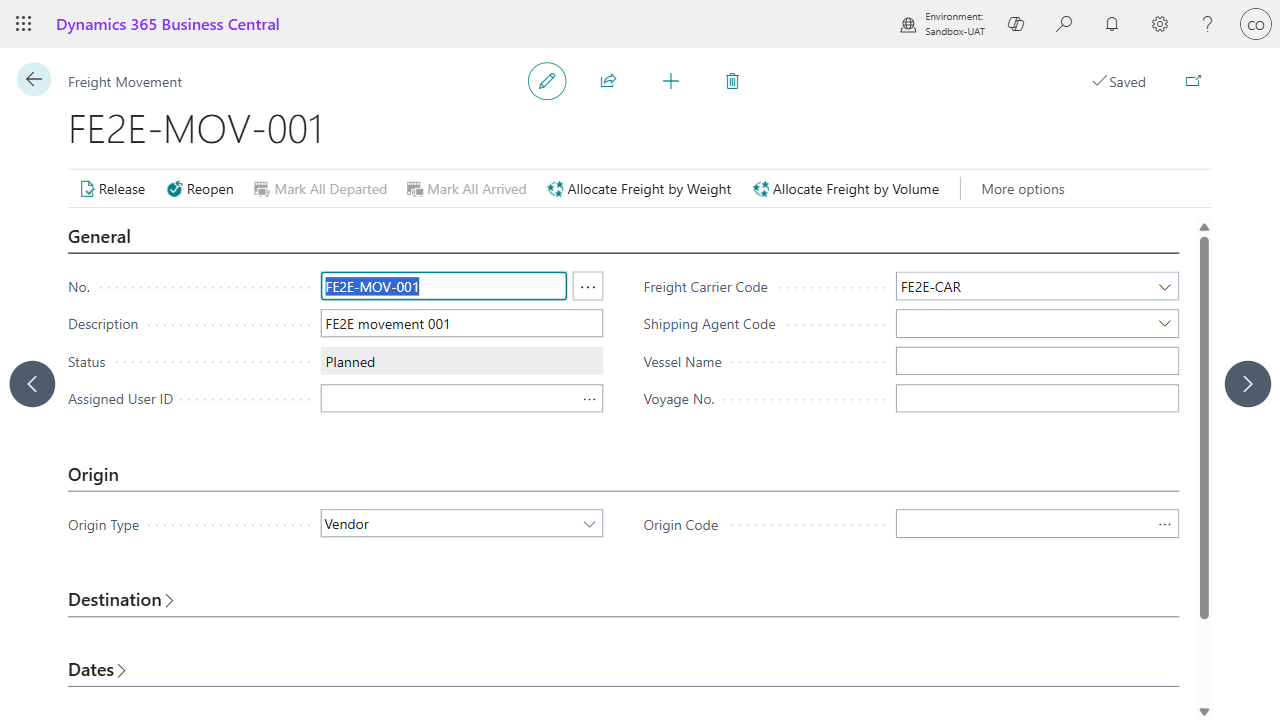
- Carrier Code (defaults from Shipping Setup).
- Origin Type and Origin Code: where the cargo starts. Origin Type is Vendor, Location, or Other Place.
- Destination Type and Destination Code: where it ends up.
- POL Code (Port of Loading) and POD Code (Port of Discharge): filtered to Other Places with Kind = Port.
- Vessel, Voyage, ETD, ETA.
- Stack Open Date and Stack Close Date: the carrier's tendering window for this voyage. Editable on the header; the values cascade to every movement line and are read-only there.
- Bill of Lading No., Booking Reference: paperwork captured against the voyage.
Status starts at Planned. Releasing the movement (Release action) moves it to Booked. From there the ribbon's Mark All Departed and Mark All Arrived actions drive the rest of the lifecycle (see §7).
The ribbon also surfaces Allocate Freight by Weight and Allocate Freight by Volume for distributing item charges (see §8).
3.3 Add movement lines
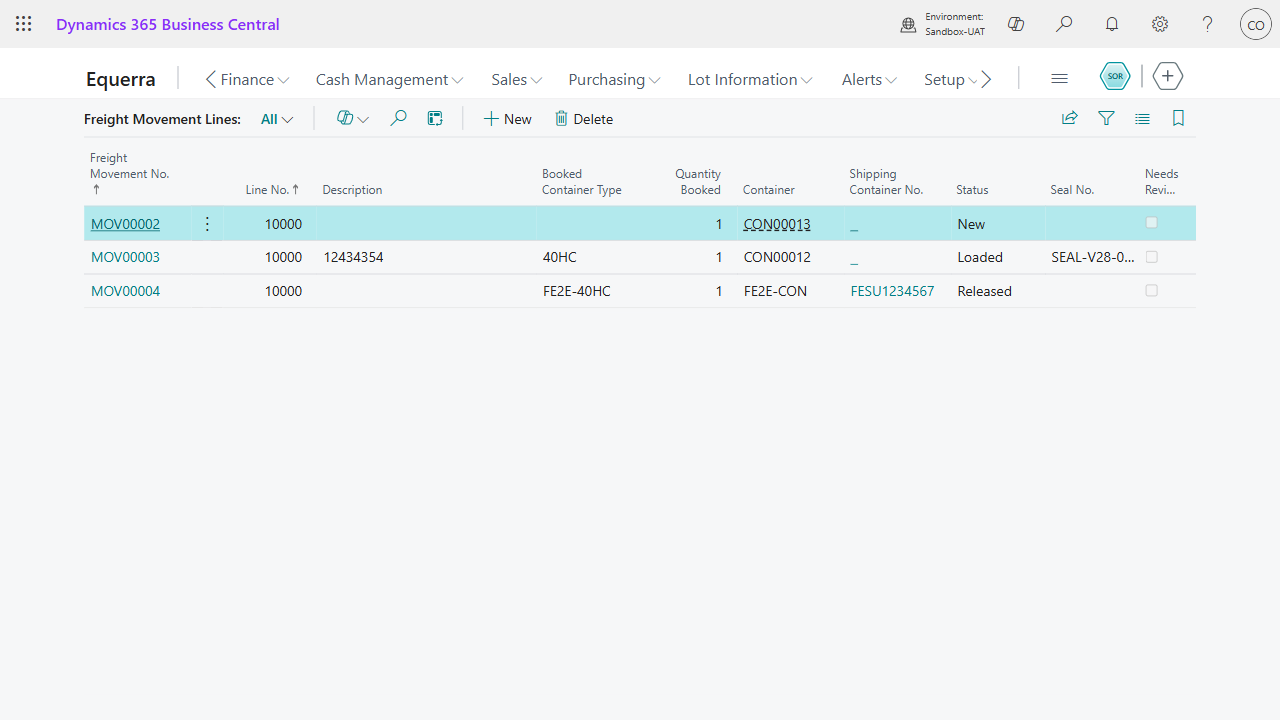
The Movement Lines sub-page on the movement card lists the bookings on this voyage. Each line captures what you committed to with the carrier: the booked container type, planning dates, and (when the carrier confirms) the assigned physical container plus its per-voyage details. You can:
- Add a new movement line directly from the sub-page. Line No. is auto-assigned in increments of 10000 (10000, 20000, 30000 ...). Fill in the booked container type and any planning details.
- Set Container inline on the sub-page when the carrier confirms a container, or open the line's card and use its Container fasttab. The Shipping Container No. column shows the physical ISO marking automatically.
A movement cannot be released until at least one movement line exists.
4. Movement lines and shipping containers
Elevate Shipping separates what you booked from what physically shipped:
- Freight Movement Line is one row per booked container slot on a movement. It carries the booking intent (type booked, planning dates, packing specs) and the per-voyage reality (assigned container, seal, weights, packed date, ATD, ATA). Each line carries one physical container.
- Shipping Container is the physical asset: ISO 6346 number, container type, tare, internal volume, notes. One asset can appear on many movement lines over its lifetime; the asset record itself stays clean of per-trip data.
Cardinality: a movement line has exactly one container; a container can be on many movement lines.
4.1 Freight Movement Line fields
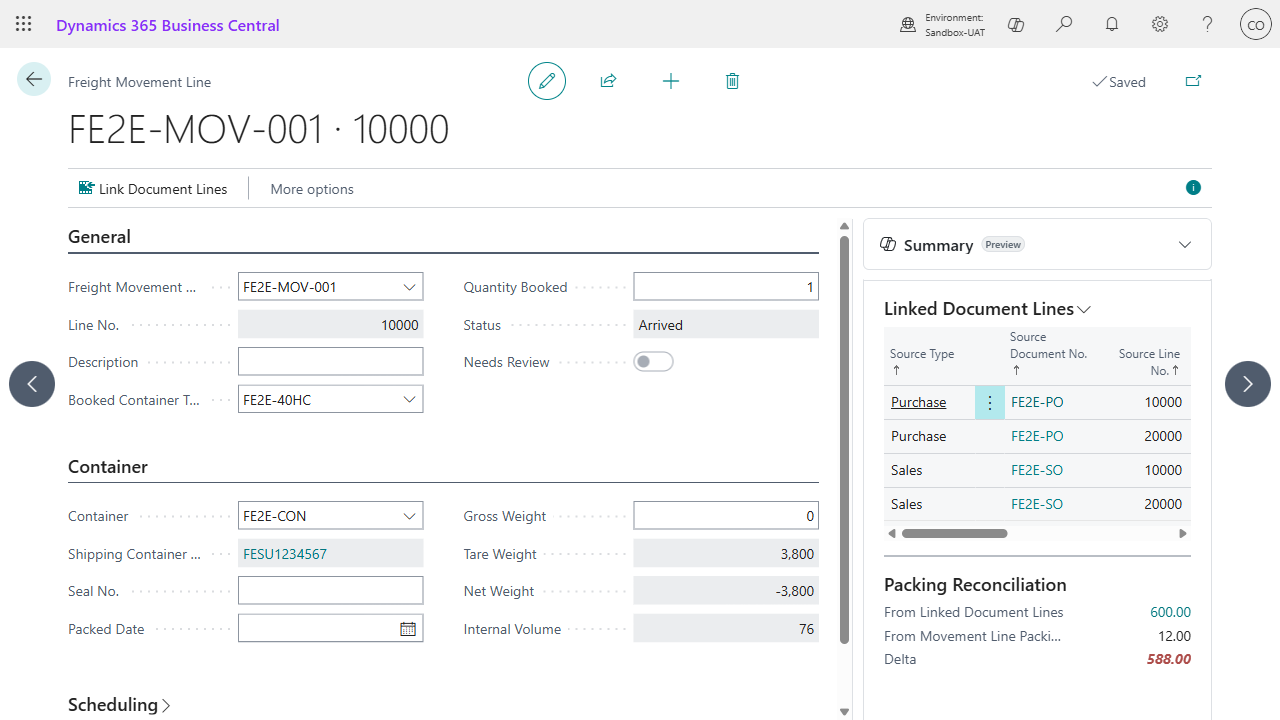
On the Movement Line card (and the Movement Lines sub-page on the Freight Movement card):
- Movement No. + Line No.: the line's compound identity. Line No. is an integer auto-assigned in 10000 increments, exactly like Sales Line / Purchase Line / Transfer Line.
- Description: free text describing the booking.
- Booked Container Type Code: the type booked with the carrier. Auto-fills planned tare and internal volume from the type.
- Quantity Booked: how many physical containers the booking covers. Default 1.
- Container: the internal id of the Shipping Container asset assigned to this booking. Pick from the Shipping Containers list. Optional during planning, set when the carrier confirms.
- Shipping Container No.: read-only flowfield that surfaces the physical ISO 6346 number of the chosen container.
- Seal No.: the seal applied to the container for this voyage.
- Packed Date: when the container was packed.
- Gross Weight: cargo + container weight for this voyage (you enter this when known).
- Tare Weight, Internal Volume: read-only by default - cascade from the container asset. Editable if Snapshot Container Weights is on in Shipping Setup.
- Net Weight: computed as Gross - Tare once Gross is entered; stays 0 while Gross is blank.
- Stack Open / Stack Close Date: the carrier's tendering window. Read-only; set on the header, cascaded here.
- Status: New, Loaded, Released, Partially Departed, Departed, Partially Arrived, Arrived, Closed. Set by the Release / Mark Departed / Mark Arrived actions.
- ATD / ATA: actual departure / arrival dates. Stamped by the Mark Departed / Mark Arrived actions (see §7).
4.2 Assigning a container
From the Freight Movement card's Movement Lines sub-page you can fill Container directly inline. Pick from the Shipping Containers asset list. If the carrier-confirmed container does not yet exist in your asset registry, create it first via Shipping Containers in Tell Me, then come back and pick it.
The same physical container can appear on many movement lines (across different voyages) over its lifetime. The Shipping Container asset card shows a Movement Lines counter for the asset's lifetime usage, plus a Movement Lines factbox and ribbon action that lists the actual voyages.
4.3 Shipping Container asset
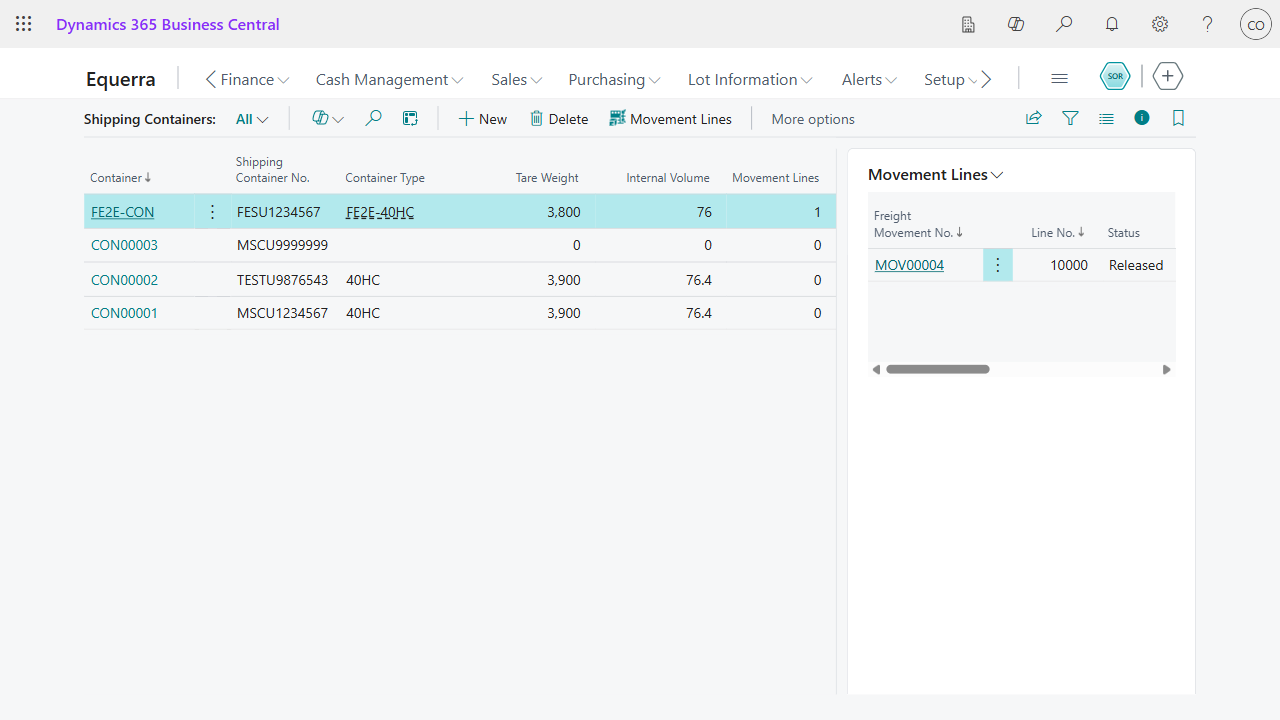
The Shipping Container card (asset registry) carries only the things that travel with the asset itself:
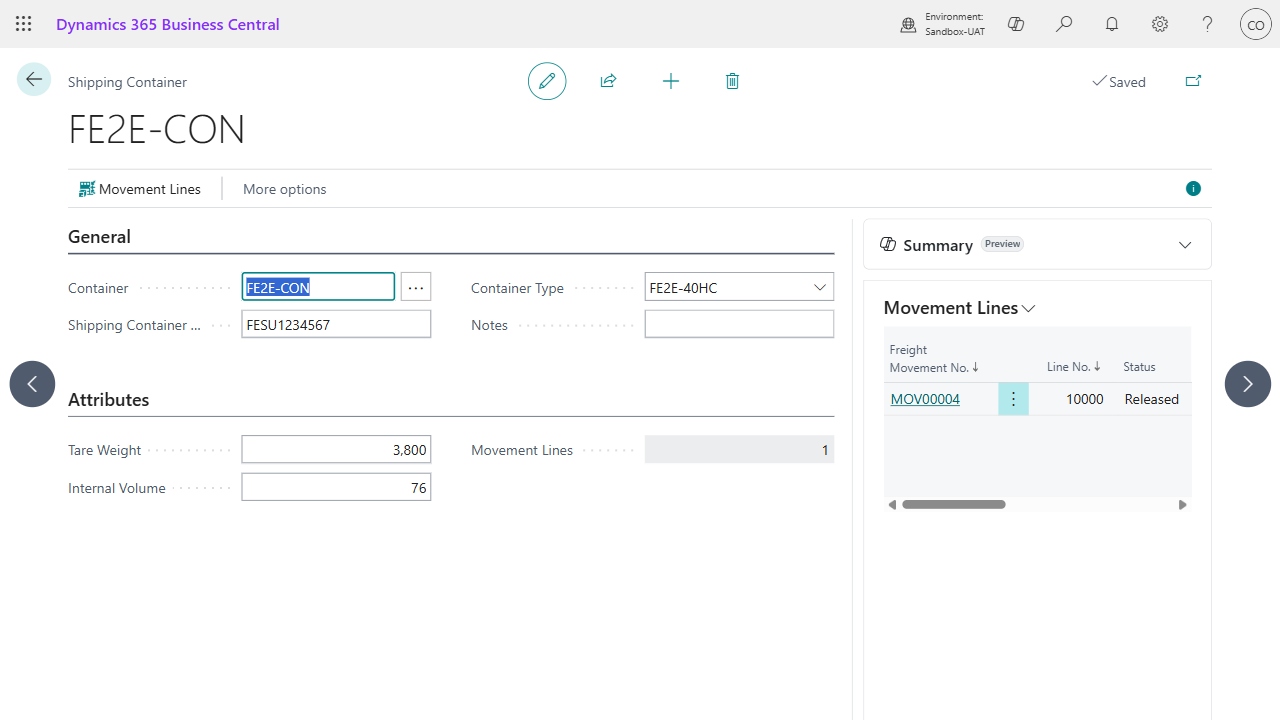
- Container (No.): internal id (auto from
SHP-CON). - Shipping Container No.: the physical ISO 6346 code (e.g.
MSCU1234567). Unique across the company. - Container Type Code: the physical type. Auto-fills Tare and Internal Volume from the type.
- Tare Weight, Internal Volume: the asset's static measurements. Cascade to active movement lines when changed (unless Snapshot Container Weights is on).
- Notes: free text.
- Assignment Count: how many movement lines have ever referenced this asset.
The right-hand Movement Lines factbox shows the asset's recent voyages. The Movement Lines ribbon action opens the full list filtered to this container, for tracing every voyage it's been on.
Per-voyage data (seal, gross weight, packed date, ATD, ATA) lives on the Movement Line, not on the asset.
5. Linking order lines to a movement line
Once a movement line exists, you can attach the order lines whose stock the booking covers.
5.1 From the order side
On a Purchase Order, Sales Order, or Transfer Order:
-
On the lines you want to allocate (multi-select supported), click the Link Document Lines action on the line ribbon.
-
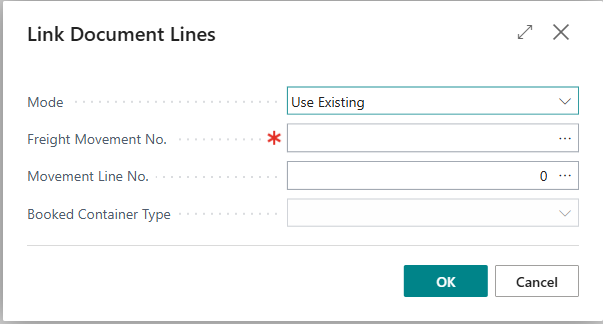
The dialog opens. Pick the target movement line (existing or new). Click OK.
-
The selected lines are now linked. The Movement Line column on the subform shows the booking, and the Container column shows the internal id of the assigned container.
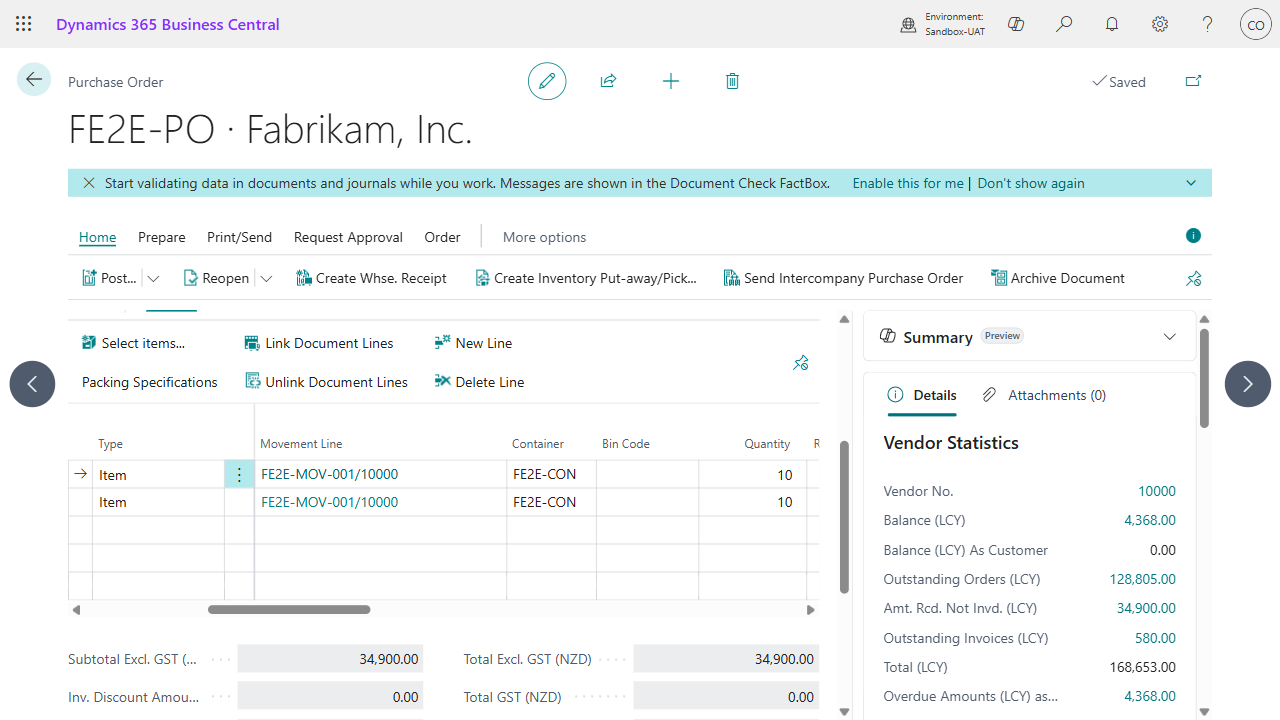
You can only link a source line to one movement line. The system blocks a second link with a clear error.
5.2 From the movement line side
On the Movement Line card, use Link Document Lines in the ribbon.
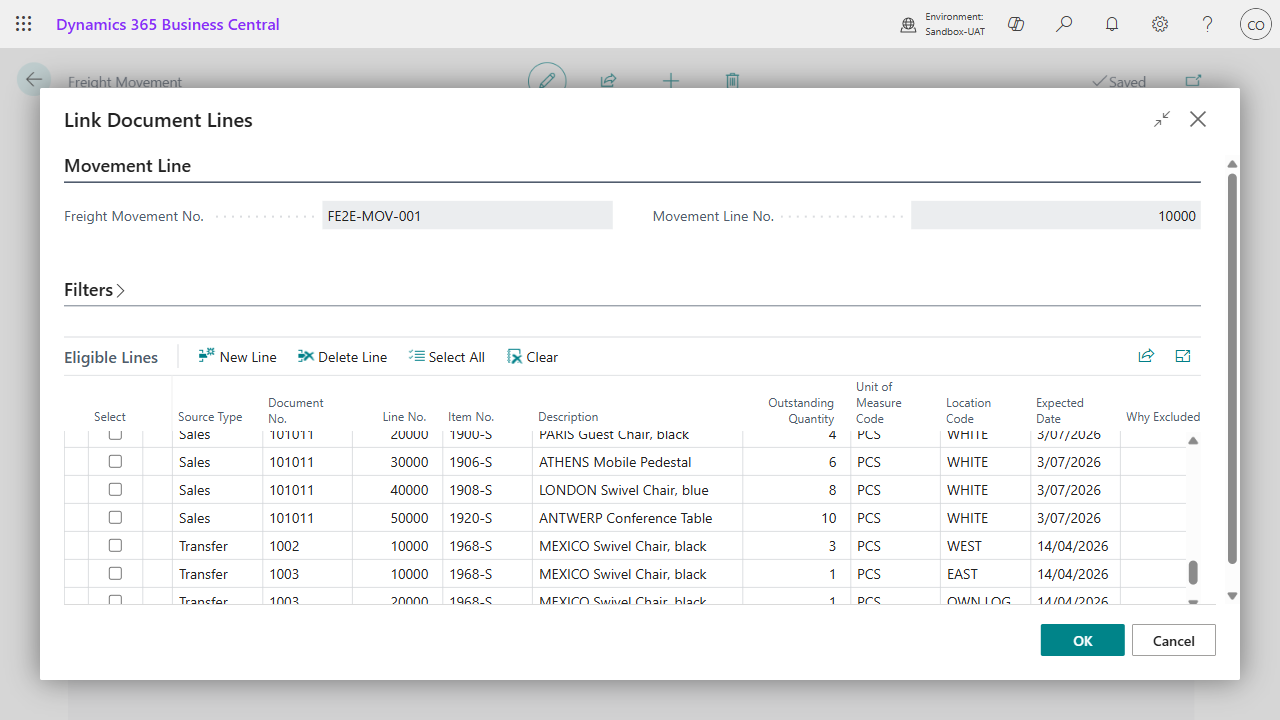
- The dialog opens, listing eligible order lines (purchase orders, sales orders, transfer orders with outstanding quantity).
- Filter the list using the type toggles + the date / vendor / customer / location filters at the top, then tick the lines you want.
- Click Select All (or Clear) to bulk-toggle the visible eligible rows. Click OK.
- All selected lines are linked to this movement line.
5.3 What happens if someone edits a linked line
If a user changes Quantity, Item No., UoM, Location, or any expected-date field on a source line that is linked to a movement line, Elevate Shipping:
- Flags the movement line as Needs Review with a stamped reason (which field changed and on which line).
- Pops a notification with a link to the affected movement line(s).
This does not block the edit, just makes sure the warehouse sees that the planning changed.
5.4 Unlinking
Multi-select the lines on the order subform (or in the Linked Document Lines factbox on the movement line card) and click Unlink Document Lines. The action confirms once, unlinks each selected row, and surfaces an unlinked / skipped count message at the end. The source documents are not modified.
You cannot unlink lines on a movement line that has Partially Departed or later (Departed, Arrived, Closed). The action errors with a clear message; release a different movement line for any further changes.
6. Packing specifications
For the common case the customer only needs to record how the container is packed (for example, 21 pallets). That sits on the movement line. The system also supports a more detailed per-document-line packing surface for customers that need to track packing on the order side and reconcile it against the container-level spec; that surface is opt-in via Shipping Setup.
6.1 Add packing specs on the movement line
Open the Movement Line card. The Packing Specifications sub-page lists what is being packed against this booking. Add one row per pack type the booking covers:
| Field | Meaning |
|---|---|
| Pack Qty | Number of packs (e.g. 21 pallets, 4 loose cartons). |
| Pack UoM Code | Unit describing the pack (e.g. PALLET, CARTON). |
| Notes | Optional free text. |
A mixed load is two or more rows.
This is everything your external logistics partner needs to know about how the container is packed; combined with the linked source documents (PO / SO / TO) and the container's seal number, it tells the partner exactly what's on the boat and where it came from.
6.2 Advanced: per-document-line packing specs
Turn on Enable Per-Line Packing Specs in Shipping Setup if you need to track packing per source-document line and reconcile the totals against the movement-line spec. The flag is off by default.
When the flag is on:
-
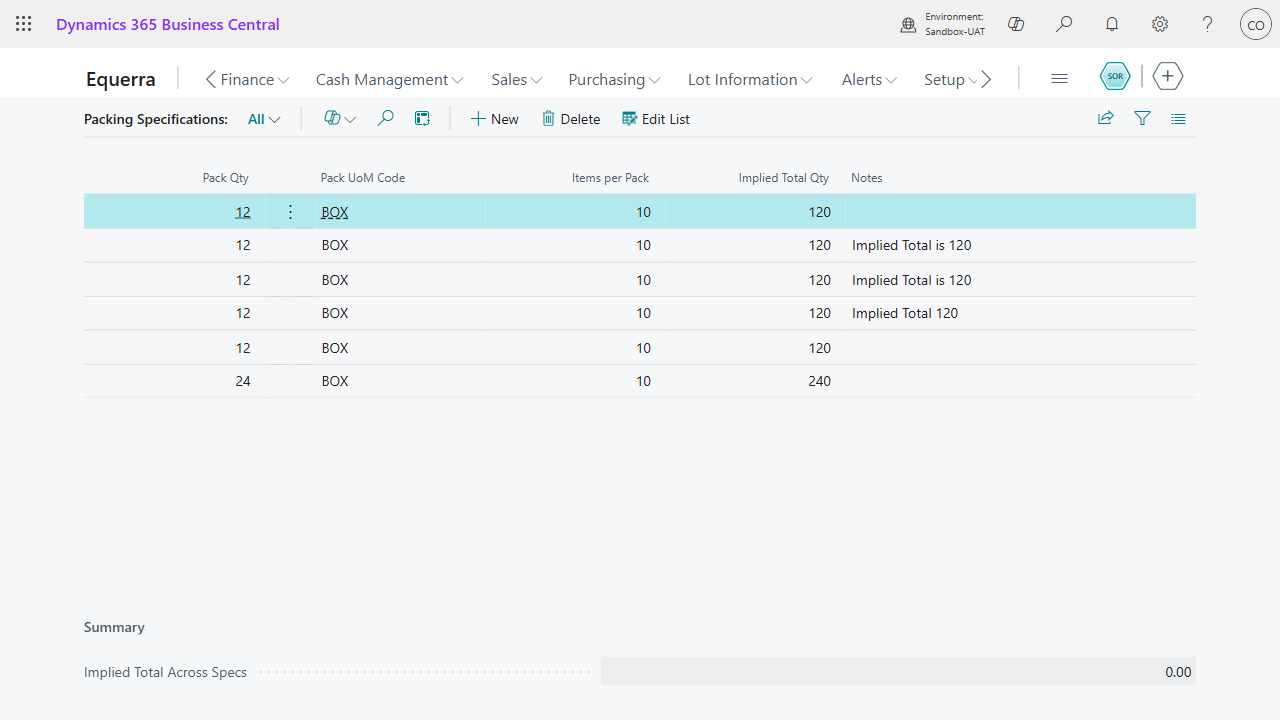
The Packing Specifications action appears on the Purchase / Sales / Transfer order line ribbon. It opens a per-line spec page with Pack Qty, Pack UoM, Items per Pack, and Implied Total Qty (calculated as Pack Qty x Items per Pack).
-
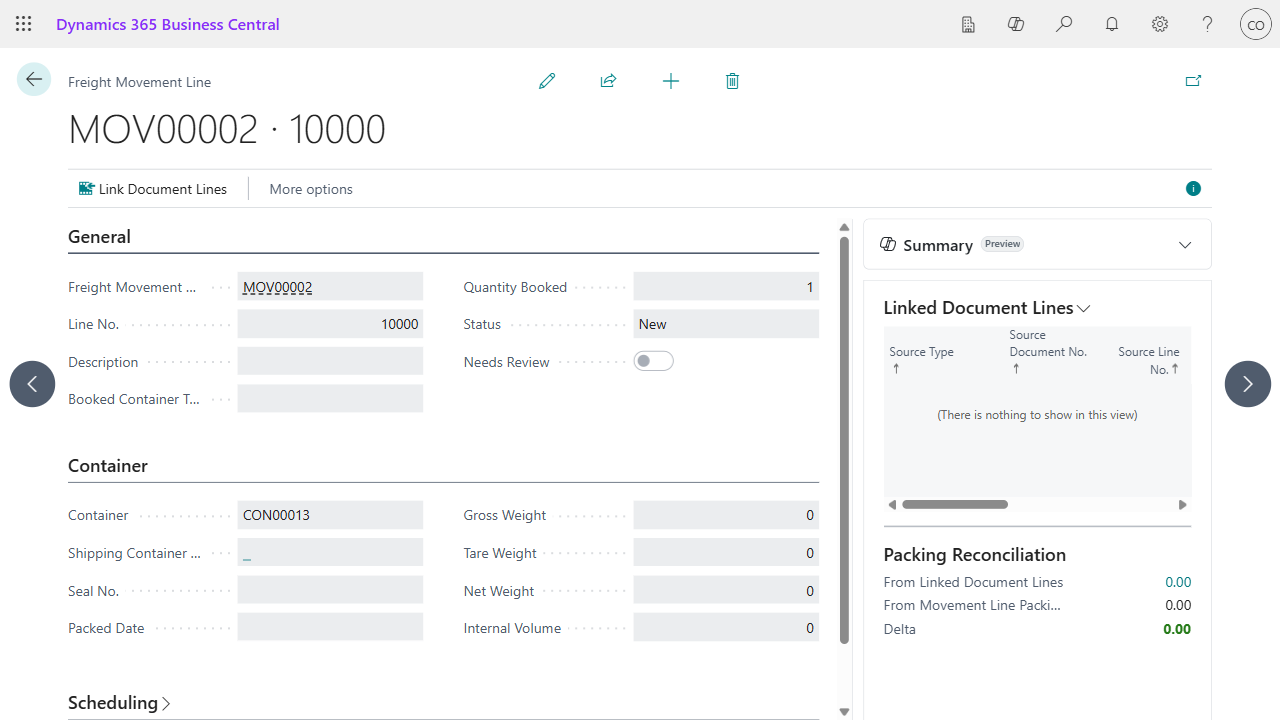
The Packing Reconciliation factbox appears on the Movement Line card. It sums the doc-line implied totals across every linked source line, sums the movement-line packing rows, and shows the Delta. A non-zero delta signals that someone needs to look at where the doc-line plan differs from the container-level plan.
6.3 What happens when the order is posted
When the source order line is fully posted (Quantity Received or Quantity Shipped reaches Quantity, or someone marks the line Completely Received or Completely Shipped manually), Elevate Shipping automatically:
- Copies the doc-line packing spec rows over to the posted side (Posted = true, keys pointing at the posted receipt or shipment).
- Deletes the unposted-side rows.
Implications:
- Partial postings do not move the data. The unposted-side specs stay where they are until the line is fully closed.
- Transfer orders close at the receipt side. The posted Transfer Shipment Line carries no specs; the spec lives on the unposted line until the goods arrive at the destination, then moves to the posted Transfer Receipt Line.
- Manual closure (without a final posting) clears the unposted side. No posted-side copy is made, because there is no posted document to point at. If you need to preserve the spec, export or screenshot the doc-line page before clicking Completely Received / Completely Shipped.
You can review posted specs by clicking the Packing Specifications action on the posted receipt or shipment line.
7. Departure and arrival
Once a movement is Booked, the rest of its lifecycle is driven from two actions on the Freight Movement card ribbon: Mark All Departed and Mark All Arrived. One click per voyage; every movement line and every linked source document is handled together.
7.1 Mark All Departed
Click Mark All Departed when the vessel sails. For every Released movement line on the movement, Elevate Shipping:
- Posts the linked Sales Order shipment for each linked outbound source line.
- Posts the linked Transfer Order shipment for each linked transfer source line.
- Stamps the line's ATD (Actual Departure Date) and moves its Status to Departed (or Partially Departed if some outbound documents failed to post).
- Stamps the header's ATD if this is the first line to depart on the movement.
- Stamps the freight movement number, ATD, and a Posted Line Link onto every posted shipment line, so cost allocation can find them later.
If a single source document fails (e.g. a Sales Order has no outstanding qty to ship), the whole batch is not blocked; that one document is skipped silently, the other lines still depart, and the summary message reports the ok / fail counts.
7.2 Mark All Arrived
Click Mark All Arrived when the vessel docks. For every Departed (or Partially Departed) movement line, Elevate Shipping:
- Posts the linked Purchase Order receipt for each linked inbound source line.
- Posts the linked Transfer Order receipt for each linked transfer source line.
- Stamps the line's ATA and moves its Status to Arrived.
- Stamps the header's ATA if this is the first line to arrive.
- Stamps the freight movement number, ATA, and the Posted Line Link onto every posted receipt line.
Already-fully-received documents are treated as silent successes - the batch is idempotent across replays.
7.3 Per-line actions
The Movement Line card also exposes Mark Departed and Mark Arrived actions, scoped to that single line. They run the same logic as the header actions; use them when you need granular control (e.g. retrying one line that failed during a header-level batch). The header actions are the primary surface.
8. Cost allocation
When the freight invoice arrives from the carrier, you can distribute its cost across the receipts or shipments that the freight actually moved. The two-step model: a per-Item-Charge-Assignment scope, plus a movement-level scope.
8.1 Allocate from the freight invoice
On the Item Charge Assignment page (opened from the Purchase Invoice with the freight Item Charge line):
- Set the Freight Movement No. and Freight Container on the assignment row to scope it to the voyage.
- Click Get Receipt Lines by Container. Elevate Shipping pulls every posted purchase receipt line stamped with that movement / container (Mark Arrived populated the stamps in §7) and inserts an assignment row per line. Sales-side has the equivalent Get Shipment Lines by Container.
- Click Suggest by Weight or Suggest by Volume. The freight charge is distributed proportionally across the assignment rows, respecting any manually-entered Qty. to Assign on a row.
Cross-vendor and cross-currency allocation is blocked by default (Shipping Setup) to keep finance numbers sane. The engine errors with a clear message rather than silently mixing currencies.
8.2 Allocate from the movement card
The Freight Movement card also has Allocate Freight by Weight and Allocate Freight by Volume actions. These work the same way but iterate every assignment row tagged to the movement, in one pass. Useful when several invoices land at once for a single voyage and you want a single allocation step.
9. Telemetry
If your administrator has enabled telemetry (Shipping Setup, Telemetry Enabled), the extension logs events for: install, carrier created, movement created and released, container created and linked, doc line linked, line edit warnings raised, packing specs copied to posted, departure / arrival posted, and cost allocation suggested. Event IDs are prefixed SHP-EQL-.
This is internal-only diagnostic data. It does not include item content or quantities.
10. Permissions
Three assignable permission sets are installed:
| Set | Purpose |
|---|---|
| SHIP-USER | Day-to-day users. Read setup, full RIMD on movements, containers, linkages, packing specs. |
| SHIP-SETUP | Administrators who maintain master data. SHIP-USER plus modify on setup tables. |
| SHIP-ADMIN | Full access including delete on setup tables. |
Assign one of these to a user (User Setup or via the BC permission group flow) before they start using the extension.